Sunday, February 10

On the edge of no-where

Lazy days. There aren't too many of those. Even in a stay-cation you are surrounded by the things you should be doing instead of just enjoying each other and where you are right now.

An easy start listening to the wild life, stitching, and breakfast in the sunshine. We headed just a bit north of Jenner to Fort Ross (check one off the National Historical list).

We got there about noon, and while wandering through the informative visitor center (Imagine that!), we overheard that they would be loosing the windmill at 1:00 for an interp. session. This isn't a large site, so we headed down the hill to the Fort and meandered through half the buildings, taking lots of pictures along the way. About 12:55 we hoofed it back up the hill to listen to the session and watch the release of the windmill.

The windmill was built on Russia using the tools and techniques of the 1800's, torn down and reassembled at Fort Ross in two weeks. Most of the time, the blades are tethered to the ground, but once a month they let them spin just to keep everything working. I've got a video, but well have to see if I can post it later.

After they were done with the session, we wandered back to the Fort and checked out the remaining buildings.

Back south again, this time to Goat Rock State Beach which we could see from the deck of our suite. A long walk watching the spray from the waves and a quick fall in the sand while running away from a random wave. Wet pants and its time to go back to watch the sunset from our room.



Friday, February 1

HL - Rail Fence


Love the blues and whites in this top. But right now I'm posting this as a fail. More brains required.


So to start with, there is a body of 6" squares assembled in a 8x10 patch (Let's call this "body"). I've got strips that Hazel had assembled, waiting to be cut into blocks and put back together. And I've got scads of each of the colors, all stripped up, waiting to be joined. (We will call these "New").

Problem. The finished size (on average) of the body blocks is 6" x 6". The finished size of the new blocks is 5.5" x 5.5". I can't then just keep adding rounds to the existing body as they won't come together just right and it will end up looking like a monkey put it together.

Solution. (Maybe). I've found this green cherry blossom print that will wake this quilt up. My original intent was to use it for the borders. So what if I use it to build an interior border between the body and additional rounds of new blocks? That way they won't be butting against each other and I can make this a king size rather than couch size quilt. Sounds like a plan to me.


Measure carefully, pull out some excel skills to check my math and some graph paper to check my logic. Cut carefully. Sew carefully. Attach the first strip of new blocks. Curse madly when you realize you are a quarter inch short on the first border.
Fortunately, I have more of the cherry blossom fabric and there should be some assist tonight. I'm afraid I'm going to have to do this on the fly as I don't think the body is actually true.

Fingers crossed. Wish me luck. And if you have some advice (beyond the use of an adult beverage:)), please let me know.


Monday, January 28

HL - Road to OK? and a busy weekend

Or at least I think that is what this one is.

This weekend I had a house to myself, well not including the dogs that is. So Saturday I had a "ladies who lunch" kind of day - which included a class on combining zen tangle and free motion quilting on my aging lady of a sewing machine, picking up Snowball, lunch at the Yard House, some shopping in Santana Row, and a trip to Jo-Ann's to see if they had anything workable for the quilts I'm working on. Success or near-success on all points.

Once I got home I pieced the remaining blocks for the Jacob's Ladder Road to Oklahoma (I think). There were only enough to complete nine blocks, but that was enough to turn this into a king size spread. There were many more pieces for partial blocks, and I put together a strip of them thinking I would insert them into the back of this monster.

The next day was shining bright and the coffee was fresh and hot. I sewed the blocks into strips (two of them) and then attached the strips to the main body of the quilt. "Modern" quilts these days tend to not include borders but this isn't one of those. I pieced two borders to attach and then the top was done. It took a lot longer on the machine than it does to type out in a blog post, trust me on that.

I had rescued a long piece of red toile print fabric from Hazel's stash, and felt that it would make a perfect backing. Measure (88"/100"), slice the back and where are those blocks? I *still* can't find them and I have put everything away since then. (Let me see, I sewed them together, ironed them, admired them, and then where did they go?) I've since decided that it was the quilting muse telling me it wasn't the best choice, so moving on I've extended the red toile with some navy pin-dot that will be used for the binding as well. I will piece the back some time this week and then it will be ready for drop off this weekend.

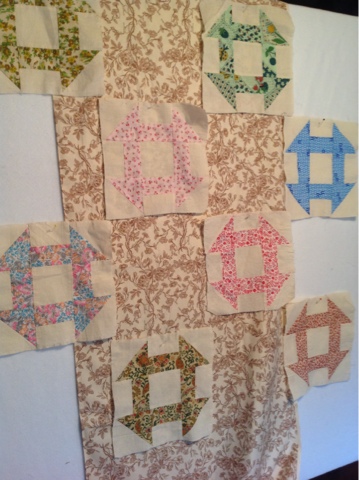
Opinion please - I'm auditioning the cream/chocolate toile for the space blocks in the churn dash. I'm thinking this is going to be low volume, the muslin in the pieced blocks is very, um, rough? It's a loose, coarse weave and all the churns are scrappy prints that look like they were printed anywhere from the 60's to the 90's - maybe even up to 2010. There's not going to be a match to anything, but I'm kinda liking this.


Monday, January 21

HL - Lone star & ???

Two more tops are ready for the quilter this weekend. I can hardly wait to see how the one I dropped off comes back.

So first - the Lone Star. As previously shown, it was quiet, shy, and almost nondescript, in spite of the bold colors Hazel used for the diamond shapes. A simple change out of the fill colors from that baby blue to teal and the whole thing has a new look. She glows! I had to do inset seams but they either weren't as bad as I expected or I didn't do them right.. It surpasses my expectations though. A modern print for the back and I'm thinking of binding in red. Let me know what you think. It's 80" x 80", so a decent bed size.

The second is ready to go as well. Hazel had assembled 14 2x2 sets of the blocks, however one was too small to be used with the others and two had been misassembled. Three of the 2x2 sets she had stripped together. My job - assemble three more strips and join them together, well after fixing one of the poor assemble jobs. A simple yellow border and I am done with this top. My question to you - what's the name of this block? I can see houses or arrows or pinwheels or ??? This one is too small for even a twin bed so it'll become a couch snuggle blanket.


And a quick p.s. Larry Bob, one of the dogs we adopted last year, definitely has allergies. The worst ones are for ragweed and oak trees, but he also has allergies for human dander, redwood trees and soybeans and about 15 other things. Looks like I get to do allergy shots. Poor doggie. (Larry Bob is the dark boy, and Sophie is the tan girlie)


Sunday, January 13

HL - Snowball + 9 Patch

So I fibbed. It turns out that this beauty is actually the first one that is ready for the quilter to get her hands on.

It's a combination of scrappy nine-patch and snowball blocks that probably has an official name (let me know if you know!) that are grounded by the use of a medium blue. The body of the quilt was complete, and no extra blocks or pieces of blocks were found to add to it. Each of the blocks is 5.75" square. At 9 x 10 blocks, it's a smidge more than 4' x 4'. There are yards of the blue fabric in the stash I brought home, but she used it in so many projects that I'm afraid to cut any more than necessary in case I need it for something else.

My contribution to this top is a 5.75" border of pink polka dot fabric. The medium blue shows up in the corners in a nine-patch block, just to tie the bits together. The back will be the very happy floral print, that for some reason seems to meld with all the scrappy prints that Hazel used. A binding of a slightly darker blue will tie the two together after its quilted.

I actually consider this to be a companion piece to an existing quilt we have in the house. The pink and blue turtle quilt was made for Mark by his Granny (paternal). Granny was a prolific quilter herself. We are fortunate to have a quilt made by her hands, as after her passing there was a fire at the farm and the majority of her quilts were destroyed.

On his tenth birthday, Mark was out at the farm and his Granny brought him to the bedroom. There was the quilt laid out, made especially for him. Even then he understood what a labor of love it was. It's machine pieced & appliqued, and hand quilted, with embroidery details for the turtle faces. The binding was replaced by Hazel in 2007 as it was frayed quite badly.  The border is original to the quilt.  I'm still trying to figure out the "fencing" print that was used...

It's a good feeling to have something ready to be quilted. It's overwhelming, almost, the amount of unfinished projects that were left behind.

Progress on the Lone Star - fill pieces removed, need to iron/starch the star so it will stop fraying and be easier to reassemble. I can't find my big ruler so the hunt is on! I'll need it before I try to cut the replacement pieces.


Sunday, January 6

HL - Purple Log Cabin Quilt

I think this might actually be the first one I finish. It's a purple log cabin square, consisting of two solids and two prints. Hazel has enough centers for 42 squares, or a 7 x 6 arrangement. Happily, she had finished ten of the blocks and sewn them together so I know what she intended.

It may be the first I finish as all the strips are cut, and, lucky for me, the only time I will have to match seams is when I join the blocks together. No bias, no points, just simple straight lines. Again, the prints aren't exactly my first choice, and I wouldn't be so fond of the solids as she so obviously was, but looking at the web and the books these days, she may have been ahead of her time with a modern quilt look. And note too, that even in a so very purple palette, she's still managed a touch of red.

What would you think if I removed the last two of the ten blocks and rearranged them more into a concentric light/dark pattern? I know there is a name for it, but I haven't used my google-fu yet!

The machines are still in the shop, so I've been organizing and sorting and planning and clearing. I should have them back by next weekend tho - fingers crossed...


Sunday, December 16

Hazel's Legacy

Sideways, but still...  Recently we returned to Georgia where I had the experience of sorting through the remains of my mother-in-law's particular legacy. In this case, boxes and boxes of fabric and cut fabric and blocks and quilt tops very near to completion. I was searching specifically for the last quilt we had been working on together - a kaleidoscope quilt that was cut and more blocks than not assembled. We found it the next to last box that was opened.  I did a happy dance and got teary-eyed at the same time.

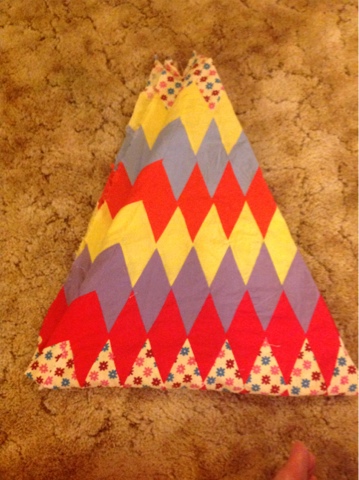
This however, is not that quilt top. This is instead a finished top. I say finished, but obviously there were issues or it would have been quilted.  A couple of things that my inexperienced eye picks out 1) the center is puckered- was she concerned that it needed work?  2) the baby blue fabric in the fill spots is thin-like she used a sheet instead of fabric for the large pieces.  And too one of the corner squares has been pieced as if she had run out of a solid cut large enough to fit.  The more experienced eyes of the quilt fabric shop ladies pointed out that the triangle fill pieces are placed on the bias and will stretch when it is bound. Also, Hazel used two different reds - randomly - in the red stripes.  The ladies also said that the center would "quilt out" but that the triangular fills would need to be replaced.  The sole print fabric that was used seems to have little if any relationship to the solid colors that were used - the flowers are pink, teal, and maroon.

For all the flaws though, the piecing is spot on.  The star is vibrant and the size impressive. So what is an overextended girl to do?  Buy fabric of course!  The plan is remove the insipid baby blue fill pieces and replace them with (correctly) cut tone on tone teal fabric.  The teal will pick up part of the print, modernize, and coordinate with the rest of the solids in the quilt.  That is, once the sewing machine is back from the shop.

Some detail shots:


Thursday, April 26

Monday, April 16

This weekend I ...

This weekend I planted some stuff: cilantro and basil(3 kinds) and rocket and butter beans and nastruisums and chives and peppers (3 kinds) and potatoes (4 kinds) and tomatoes (4 kinds).

This weekend I pickled some socks: to set the dye on some of my handmade socks I put them in a mason jar with a glug of vinegar and some water and then nuke for 3 minutes. Let it cool and hope the dye stops running when you wash your socks. Mixed results - the best of which is that the dye set the worst of which is a now variegated and slightly felted pair of purple socks.

  This weekend I made the house happy: things got put away and wiped and now I'm happier too. This weekend I put tape on the walls: we are down to the final punch list and should (fingers crossed) be done done done this week. I've got things going where I think they will live. Pictures please? Too many. But here's the final look! (dang it. I need to figure out how to do this from the phone. I'll edit this post tonight with pictures)(and spell check)


And some detail shots....


Saturday, February 25

Kitchen Refresh, Weeks 3 and 4

We were out celebrating our 25th anniversary at week 3 of the remodel, so I'm doing a catch up here.


Last weekend found us with the windows and doors installed, and drywall from ceiling to floor.  The guys had pre-taped the drywall, ready for mud.  Sofits were built for the new wall cabinets and the window to the stairs has been closed off.  It's still open below the stairs, but all the treads are now blocked off from the kitchen.  Although we had intended to repurpose some of the cedar paneling for wainscot, it ended up not working the way we thought.

Week 3 was a short week due to the holiday, however, things moved along quite well.  Tuesday they finished the prep for the tape and mud dudes.  Wednesday the mud dudes came and did all of the seams, while Ralph and Sean painted the cabinets for the new hutch.  They were just finishing up for the day when we got home, ready to light a huge propane heater in the middle of the dining room to help everything dry - my eyes watered so much from the off-gassing.  Thursday was texture day and when we got home Friday night, everything had been primed.


This coming week should reveal the painted walls, along with the crown molding, the installation of the hutch, and maybe even start to refinish the existing cabinets.  I pick up the new oven on Wednesday, and I've ordered some of the new hardware for the cabinets.  I'm ready for this to be as fabulous as I imagine it should be. 


Wednesday, February 8

Kitchen Refresh - week 2

It doesn't look like much has happened this past week, as it's been mostly prep for the actual resurfacing.  However, I do have a new set of doors in the dining room.  The floor and walls had suffered water damage, as we suspected, and since we were looking forward to putting a door in, there's no time like the present. The floor was repaired and new frame was installed for windows to flank the door. 

It appears that the re-purposed boards have been cut down to size for the wainscoting.


And a new support box has been built for the incoming oven and microwave.  In addition, the air return for the furnace has been repaired.
Light fixtures have been installed.  Windows have been ordered.  And switches have been put into place.  The studs and joists have been "plumbed" so that when they install the drywall, it will be level. 

All in all, prep work.  Doesn't make for pretty pictures, but it is progress....

Thursday, February 2

When life hands you lemons...

You gotta crack some eggs!  And grate some butter, and whisk some flour and sugar, and turn them into some of the best Lemon Bars I've had in some time.  Martha Stewart's Cookies rules again.

We picked about a half dozen Meyer Lemons off the patio trees, and had to turn them into something tasty. And thanks to the way that deconstruction has taken place, I was able to make the Lemon Bars from Martha's book this weekend.  I zested the skins into the lemon custard portion, hoping for that little extra zing, and found it successful.  I think my pan was an 8x12 instead of the 9x13 requested by the recipe, but that just led to a thicker shortcake and custard in each bar.  I must say they are quite delish.  If you get a chance, I'd say go for it!


Wednesday, February 1